![]()
Generally disbursements are added to an existing loan via the Inbound/Process Loan Records function. Under certain circumstances however, it may prove necessary to manually add a disbursement to a borrower's loan using the Add a Disbursement function.
This function is accessed by (1) selecting a single loan via the associated checkbox, and then (2) selecting the Add a Disbursement function from the drop-down box that appears in the Loans Navigation Bar. When the Add a Disbursement function is accessed in this manner, a pop-up window is displayed as shown in this example:
The information is the lower portion of the screen (see section 2 of the example) is read-only, and was derived from the selected Loan record
A function Bar that contains Save, Delete and Reset icons. The Delete icon is disabled.
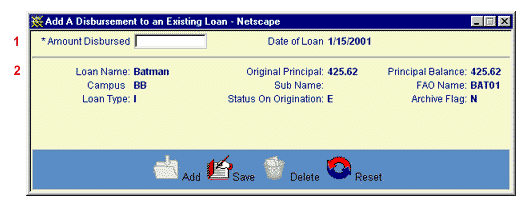
The user then enters the loan information into the appropriate field (see section 1 of the example). The following field (marked with an asterisk on the data entry screen) is required entry:
Amount Disbursed (*Amount Disbursed on the screen)
The Amount Disbursed field requires a numeric entry of format "nnnnn.nn".
The information presented in section 2 of the above example is read-only, and was derived from the selected Loan record.
Click on the Reset icon to restore the data entry form to its initial (blank) state. Any data that was entered in the form will be erased from the display. The read only data from the Loan record will remain unchanged.
To add the new loan disbursement, click on the Save icon. Clicking the Save icon will trigger an edit process that validates the user-entered data. If there are any errors, they will be displayed in a pop-up dialog box as shown in this example:

Click on the OK button to acknowledge the errors and return to the entry form. Modify the field(s) in error and again click the Save button.
If there are not any edit errors, the disbursed amount will be added to the loan principal amount and balance. The Loan Summary display will also be updated to reflect the newly-added disbursement. .
To exit this process without adding the disbursement, simply click on the main Borrower Information screen at any time to close the pop-up Add a Disbursement data entry window.