![]()
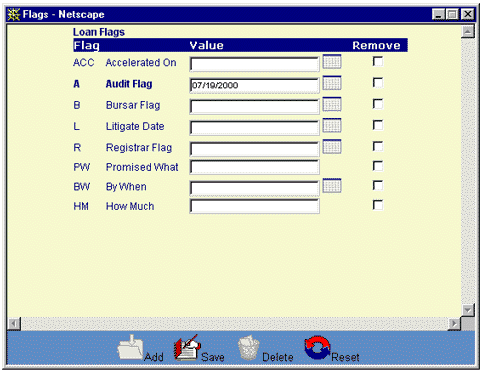
Loan flags are information tracking variables that are maintained at the loan level. All loan flags are set or maintained manually via this function.
Additional flags can be created/added to the CLM system by the system administrator via the appropriate Office Management function.
The variable which represents a particular flag can have one of four formats; the flag may be represented as a date, a yes/no value, an ASCII string, or a numeric value.
This function is accessed by (1) selecting a single loan via the associated checkbox, and then (2) selecting the Loan Flags function from the drop-down box that appears in the Loans Navigation Bar. When the Loan Flags function is accessed in this manner, a new window is opened (see example below) that contains the following:
A data entry form to be used for assigning and/or removing flags for the loan. All loan-level flags currently in the CLM system are presented in this window. Any flag that is currently assigned to the loan appears in bold font (see the Audit Flag in the example).
A function Bar that contains Add, Save, Delete and Reset icons. The Add and Delete icons are disabled.
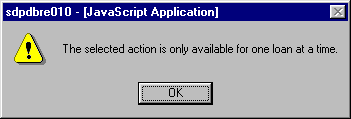
If the user attempts to select multiple loans in conjunction with selecting the Loan Flags function, an error message will be displayed in a pop-up dialog box as shown in this example:
This same screen is used to assign flags to a loan, update an existing loan flag value, and to remove previously assigned flags.
To assign a flag to a loan, enter a data value into the appropriate location for the desired flag. To update a flag already assigned to a loan, change the appropriate location to the desired value. Valid flag values depend on how the flag has been defined. There are four possible types: a date (indicated by the Date icon), a yes/no value (indicated by a drop down box), an ASCII string, and a decimal or numeric value. Contact your Systems Administrator for additional information regarding valid values for a particular flag.
To remove a flag from a loan, check the box in the "Remove" column for that flag. It is not necessary to erase the current flag value.
Click on the Reset icon to restore the entry/update form to its initial state. Any fields which were modified or updated by the user will be restored to their initial value, that is the value that was displayed when the update form was first opened.
To save the loan flags information, click on the Save icon. Clicking the Save icon will trigger an edit process that validates the user-entered data. If there are any errors, they will be displayed in a pop-up dialog box as shown in this example:
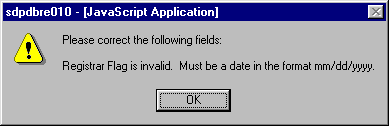
Click on the OK button to acknowledge the errors and return to the entry form. Modify the field(s) in error and again click the Save button.
If there are not any edit errors, the loan flags information will be written to the database, and the data entry window will be closed.
To exit this process simply choose another function from either the Borrower Services or Loans function drop down box. The Loan Flags window will be closed.