To apply a deferment or postponement, first select the desired benefit from the Benefit list. When the benefit is selected, the following application screen is displayed:

The application screen lists all of the borrower's loans. Loans that are not eligible for the selected deferment/postponement are indicated by being "grayed out" in the checkbox column. Loans that are eligible for the selected benefit are represented by a functional checkbox.
The user can apply the same benefit to multiple (eligible) loans using this one screen by (1) checking the appropriate selection boxes and (2) supplying the necessary benefit information for each of the selected loans.
When the Benefit Application screen is initially loaded, the Begin Date defaults to the current date, the End Date is defaulted to the number of months in the "Max Months Each" field on the Benefit record (12 months in the example above). The Extension date defaults to the number of months in the "Benefit Ext Months" field on the Note Record (6 months in the example above).
A general procedure for supplying the benefit data is as follows:
First indicate the loan(s) the benefit should be applied to by selecting/deselecting the checkbox for each eligible loan (see item (1) in the above example). The benefit will be applied to all the checked loans when the Save icon is clicked.
Update the benefit period begin and end dates (as needed). These are shown as the "Eligibility is from" and "thru" date fields (see item (2) in the above example). It is possible to postdate a benefit by providing a Begin Date value that is earlier than the current date. There are a number of validations performed on these date fields. See the Data Entry and Edit Guidelines for additional information.
If a postdated benefit is being applied, the CLM system will calculate the Interest Adjustment value (see item (3) in the above example) for each selected loan. A non-zero value will be displayed if interest was paid on that loan during the period of time demarcated by the benefit Begin Date and the current date. The user can change the displayed amount; however this user-supplied value cannot be greater than the system calculated amount.
Update the Extension date (see item (4) in the above example) as needed for each of the selected loans. There are a number of validations performed on this date field. See the Data Entry and Edit Guidelines for additional information.
The CLM system calculates the projected next payment due date (see item (5) in the above example) based upon (a) the extension date and (b) the loan's payment cycle.
If the benefit being applied is a deferment, a value of "No" will always appear in the "Bill Int?" column (see item (6) of the above example). If the benefit is a postponement, and the loan is NOT a federal loan, a checkbox will appear. If the borrower is to be billed for interest during the benefit period check the box; otherwise leave this box unchecked.
Click on this link: Data Entry and Edit Guidelines to review information pertaining to what values may be entered into the various fields on the Deferment/Postponement Benefit Application entry form.
Click on the Reset icon to restore the data entry form to its initial state. Any data that was entered in the form will be erased from the display. The read only data at the top of the form will remain unchanged.
To apply the benefit to the selected loan(s), click on the Save icon. Clicking the Save icon will trigger an edit process that validates the user-entered data. If there are any errors, they will be displayed in a pop-up dialog box as shown in this example:
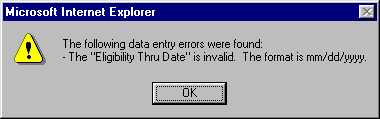
Click on the OK button to acknowledge the errors and return to the entry form. Modify the necessary field(s) and again click the Save button.
If there are not any edit errors, the benefit will be applied to the selected loan(s). The Loan Summary display will also be updated as follows for each of the selected loans to reflect the application of the benefit:
The loan status will be updated to the status shown in the "After" column (see item (7)) of the Benefit Application screen. Normally this is "D" for deferments, and "P" for postponements.
The (Next Payment) Due Date will be set to the date shown in the "After" column (see item (5)) of the Benefit Application screen.
If a non-zero interest adjustment was supplied, the loan's principal balance will be reduced by that amount.
To exit this process without applying the benefit, simply click on the main Borrower Information screen at any time to close the pop-up Deferment/Postponement Benefit Application data entry window and the Benefit Selection List.